|
|
|
brought to you in living colour by Quietfire Design January 2004 - Issue 30 |
|
Happy New Year! I hope one of your New Year's Resolutions
was to create more art. It certainly
was mine. I often seem to be so busy that creativity time just seems to
slip by unused.
|
|||||||||||||||||
|
New Subscribers! I have an opportunity for you!
Over the next few month I will be having a monthly draw from the
new subscribers list for a All you need to do is be a new subscriber and I will take care of the rest! Congratulations
to |
![]()
It was a jolt to discover as I was uploading this newsletter, that I was out of space on my server! I have been uploading things in a cavalier manner, knowing it wasn't going to last forever. Darn. So it's time to do some trimming. I have removed the first year of byhand newsletters. I will work on getting them put on a CD. I will let you know when they are available.
![]()
Don't forget if you're proud of artwork that you have stamped with a Quietfire Rubber Stamp, please send me a copy and I'll be delighted to put in the Stamping Gallery.
Don't be shy!

![]()
|
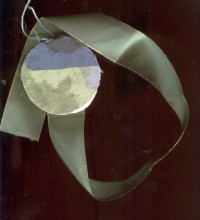
Favourite things My friend Glenys wrote to tell me about Making Memories products. I love these things! Michaels carries a lot of Making Memories products, so they're quite easy to acquire. I've just been perusing their site and found something I'd never seen before: Ribbon Charms!
Everyone from rubber stampers to scrapbookers to altered book enthusiasts will find something in this collection of toys! |
Send me your "Favourite Things" suggestions and you might see it here!
Stamping Artist Christine Parkes recently was a winner of $25 worth of Quietfire Rubber in the Holiday Card Contest on the CST list.
Thanks
for sharing your creation with us Christine -
Congratulations!!
Important links at your fingertips!
|
byhand
Products shopping
|
|||
How to subscribe to the
byhand newsletter and other stuff!
If you wish to contact
me, my email address is: suzanne@quietfiredesign.com
To subscribe:
send me an email saying 'subscribe'!
To unsubscribe: send me an email saying 'unsubscribe'.
I'll live....
To change your email address: send me an
email with both your new and old address. Thanks!
|
Come join us in our Yahoo discussion group, where we talk about artistic inspirations, make inquiries about techniques, and share quotes and resources.
|
![]()
Books to Inspire
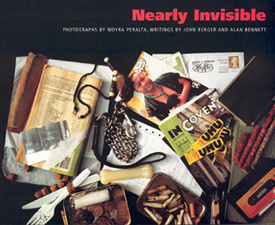
For quite some time now, I have had a email friendship with photographer Moyra Peralta. She sent me a copy of her book Nearly Invisible which is moving, unsettling and fascinating. Its subject is the homeless. As I am not really a writer - I have borrowed the synopsis from the Amazon.co.uk for a better description!
In the mid-1970s, while working in night hostels, Moyra Peralta began a personal journey to document the lives of the people she met who lived on London's streets. Her subjects welcomed her into their lives so that she was able to photograph in depth their harsh living conditions, their way of life on the street and the camaraderie between individuals. This photographer's deep and committed engagement over the years has given her a compassionate perspective on marginalized groups of people. Her photographic journey includes a visual essay of the last days of the Waterloo Bullring inhabitants, whose 15-year experiment in self-determination is symbolic of many homeless communities. The story culminates on a note of hope, that of moving on from homelessness. The book, a selection of some 288 photographs taken over three decades, contains a critical introduction by John Berger and a commentary by Alan Bennett.
My favourite parts of this book are where Moyra has photographed the possessions her street people carried with them. The cover shows one of those photographs.
Currently Moyra has an exhibition of her photos at the Open Eye Gallery in Liverpool.
Moyra has also started her own website. You can visit it at http://www.moyraperalta.charitydays.co.uk/home.htm
A contribution from the sales of Moyra's book is made to Emmaus UK for the development of communities aiding those moving on from homelessness.
Don't you agree that Moyra is a pretty amazing lady?
- as well as being a wonderful photographer!
![]()
Do you have any books that you have read and no longer want to keep, but hate to throw out because it was such a good book? Heard about Bookcrossing.com?
Here is an excerpt from the Bookcrossing website describing itself:
It's a global book club that crosses time and space. It's a reading group that knows no geographical boundaries. Do you like free books? How about free book clubs?. Well, the books our members leave in the wild are free... but it's the act of freeing books that points to the heart of BookCrossing.
Here is what you do...
* Read a good book
* Register it at Bookcrossing.com (along with your journal comments), get a unique BCID (BookCrossing ID number), and label the book. There are even downloadable labels for the registered books.
* Release it for someone else to read (give it to a friend, leave it on a park bench, donate it to charity, "forget" it in a coffee shop, etc.), and get notified by email each time someone comes here and records journal entries for that book. And if you make Release Notes on the book, others can Go Hunting for it and try to find it!
Bookcrossing never sells, gives away, or otherwise misuse your or your friends' personal information or email addresses.
Several of the byhandartists have released books into the wild
Bookcrossing has 197,363 member and 743,687 books registered. Check it out! As I type this on January 1st, I see that there was a book released in Edmonton AB today!

|
New byhand Products |
|||
|
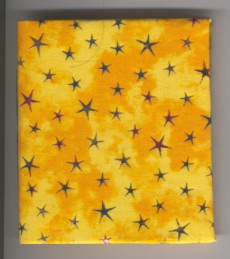
The Star Book Kits and Bare Bones refills are now available! Please scroll down in this newsletter to see how Lorna completed and decorated her Star Book |
|||
 |
 |
|
 |
|
|
 |
 |
|
|
Copper Mesh Fabric |
New sizes! |
||
|
Suzanne's Schedule 2004
|
|||||||||||||||||||||||||||||||||||||||||||||||||||||||||||||||||||||||||
|
Quietfire
Design (that'd be me!) will be heading out to these exciting events this
year
|
||
Fibre Arts Symposium |
||
|
Calgary Alberta
|
Courtenay British Columbia
|
Vancouver British Columbia
|
|
Friday, Saturday, and Sunday,
April 23, 24, and 25, 2004
|
Thursday to Sunday
May 13 - 16, 2004 |
Friday, Saturday, and Sunday, |
| At Stampers Celebration I am teaching The
Star Book on Saturday, April 24 and the Flag book on Friday evening,
April 23. Throughout the weekend, I (and some of my good friends!) will be assisting me. |
This symposium is presented by the Comox Valley Community Arts Council . At the time of writing this, the information was not up on their website, but it should be soon. I hope to be a vendor at this event. Anyone want to come to babysit my booth while I teach? |
On Friday the 13th, I'll be part of a wonderful group of vendors at the Vendor's Market from 7 to 10 p.m. Even if you're not involved in the conference, it's a fabulous opportunity to see the goodies these vendors have. On Saturday the 14th, I'll be teaching The Altered Word. |
Gentle Thoughts |
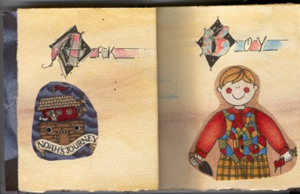
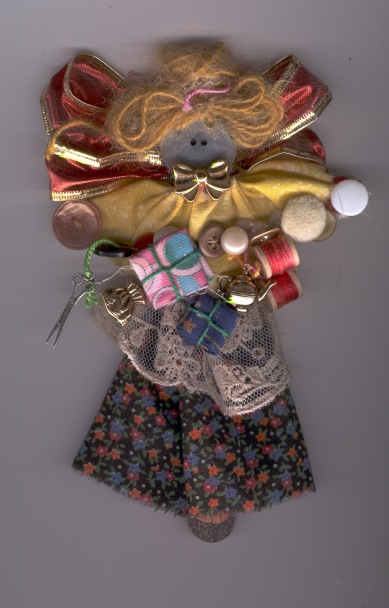
The Fabric Mini-Book ChallengeIn October I sent out the challenge for the Fabric Mini-Book Challenge. Eleven hardy individuals went to work creating with paper, pen, fabric, thread and more! The rules for the mini-book were that they may be no bigger than 5x5" and were required to incorporate fabric. Now, it could be a fabric book or it could be paper with fabric glued or stitched on the pages. Perhaps some copy transfer on the fabric, some hand dying, some beads stitched onto the fabric - imagination was the limit! Please enjoy our efforts! We love hearing the round of applause! |
|
|
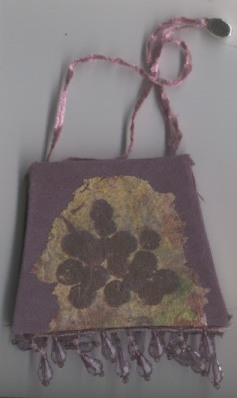
Becky Stratton In a swap awhile back, I had received a memopad that had been turned into a purse book. I didn't have any memopads that shape, so I decided to sew my own purse shaped book. Normally I make them larger. When I decided to enter the mini fabric book swap, I decided to try a mini-purse book. The napkin and little charms just went well with the fabric and beaded fringe that I bought. The purse book is just a normal codex bound book, just cut into a purse shape with handles and beaded fringe. I tried to stamp a design on the fabric, but couldn't get good coverage, so I used the napkin instead. |
|
|
Anne Atkinson |
Pam Donaldson |
|
Mary Paranchych This
is how I made my book. |
The
3rd signature has my very favourite song on it JOY TO THE WORLD
not the Christmas carol but rather by Three Dog Night. Did some calligraphy
in that.
|
|
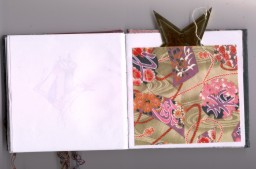
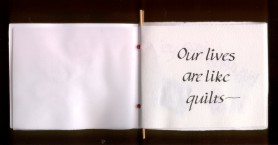
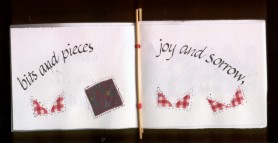
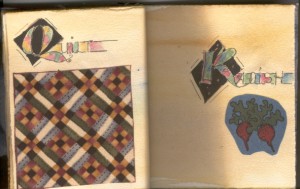
Sharon McGreevey Well, this is the first time I have used sticks in other than a piano hinge book. I found this to be much easier and to give a fairly stable format as the sticks are actually inside and supported by the pages and the holes are on the edges of the page . The theme for the book - fabric - got me thinking of quilting, then I looked for a brief quote about quilting, then I made quilt squares to finish the pages. |
|
|
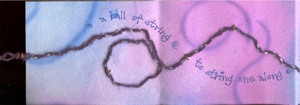
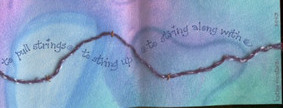
Kathy Mostardi
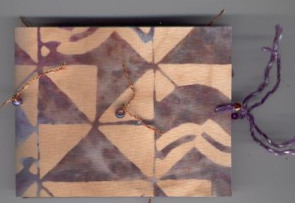
My initial idea for the book was to use some batik fabric I had had for years and it matched paste paper that had a string design in it. "Strings" became my theme. I bonded the fabric and paper with "HeatnBond" from the fabric store, cut it to size and then glued yarn on in a random fashion. The calligraphed phrases weave through the piece and all are common idioms using the word "string". I initially wanted to make the book into a scroll but mailing a round form became a problem, so I just folded it in the end. |
|
|
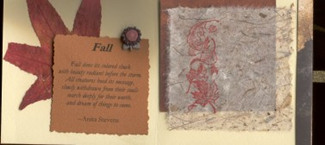
Marilyn Smitshoek I started out with no real idea of what I was going to put in the book. I just knew that I wanted to do a fabric cover, possibly padded. When I found the fabric with the large pattern of colored squares, I knew that was what I wanted to do. It suggested a fall theme to me, so I started collecting stuff--leaves, poems, a leaf stamp, reprints of a photo, papers, etc. My original plan was to make it a bit longer and to also do imprints of leaves with watercolor, but I ran short of time. Last I decided that the accordion fold would be the easiest way to put it together. My biggest problem was that i kept getting covered in glue. I seem to be adhesive challenged or something. |
|
|
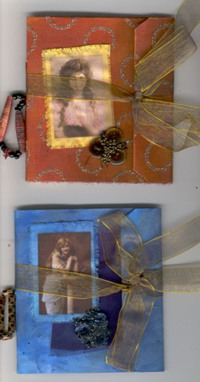
Tina Shoaga Tina created 4 completely different books for the mingle (below and right)
|
The blue book was just covered with
the fabric and some kind of ribbon binding fashioned. The image is from
Oxford impressions. |
|
Jackie Doll |
|
|
|
|
|
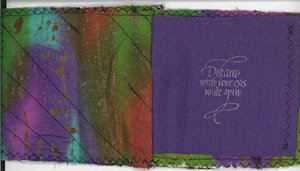
Two of Lenna's covers
|
I
had never made a soft fabric book before until I made these books for
this swap!! |
|
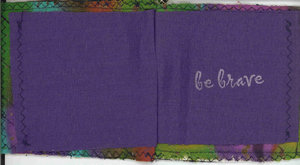
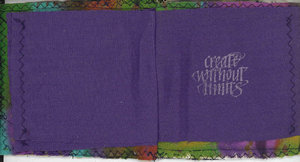
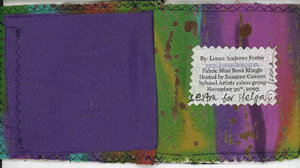
first page of her all-fabric book |
second page |
|
third page (gee, we like the use of those Quietfire Stamps!) |
last page |
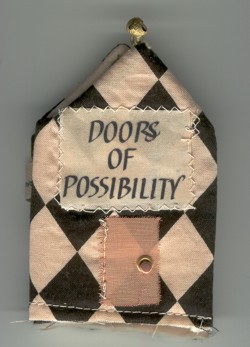 |
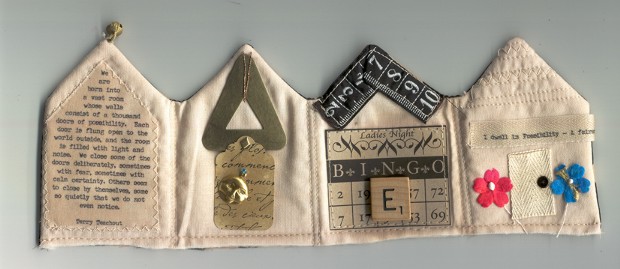
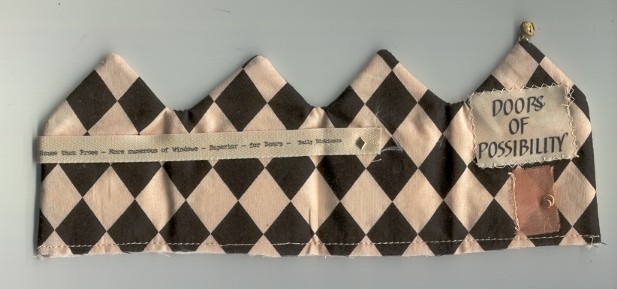
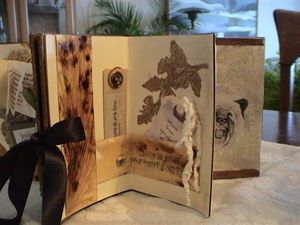
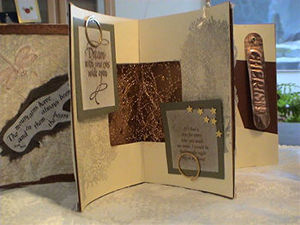
Suzanne Cannon This book with through a number of changes before it took final shape. I settled for an accordion book. Then I discovered this quote with "doors of possibility" and the idea of using the house shape was not too much of a leap. The title on the cover was hand lettered then scanned and printed on an iron-on transfer sheet. The quote on the inside was typeset and also printed on an iron-on transfer. Copper screening was used for the door on the front cover and a washer and brad as the door knob. Both fabrics were tea-dyed and the accordion is lined with warm and natural batting. The roof the second "house" was some metal pieces I found at the local hobby shop. The ruler ribbon on the third "house" is from Out of Hand (as was the harlequin fabric for the outside of the book). The Bingo card was from B-Muse and the flowers in house four were from Andaman Paper. The door to house three is a scrabble tile and the door to house four is a piece of twill. This book is 3" tall and each panel is 2" wide. |
|
inside of Door of Possibilities We
are born into a vast room whose walls consist of a thousand doors of
possibility. Each door is flung open to the world outside, and the room
is filled with light and noise. We close some of the doors deliberately,
sometimes with fear, sometimes with calm certainty. Others seem to close
by themselves, some so quietly that we do not even notice. |
|
|
Outside of Door of Possibilities |
|
City and Guilds of London Insititutebyhand
subscriber and artist Shirl Van Eaton has participated in many of the
challenges in this newsletter. She has also been a student of the City
and Guilds over the past few years. I asked Shirl if she would tell
us a bit more about City and Guilds and show us some of her work which
she has done most graciously. |
|
|
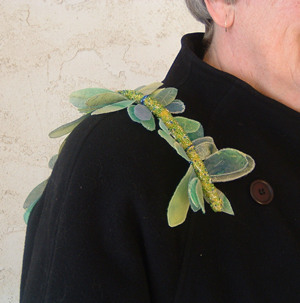
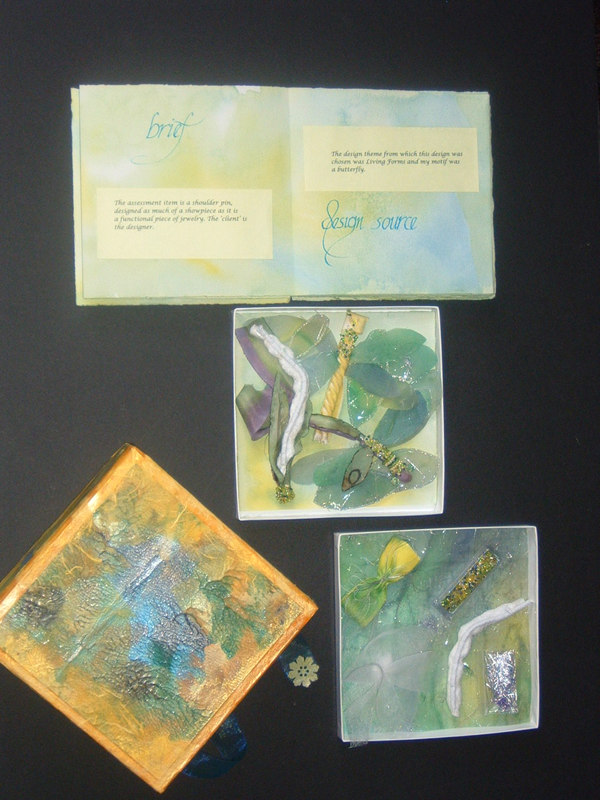
The City and Guilds of London Insititute was established in London, England, in 1887. Its' purpose was to provide training, qualification, and certification for artisans of all vocations with embroidery as one of the more artistic of those vocations. Students of the City and Guilds Embroidery course receive instruction in basic design skills using a wide variety of artistic media to express ideas. Design ideas are drawn from nature or man made items, explored through paper, fabric and stitchery and interpreted in a final assessment piece.
|
|
|
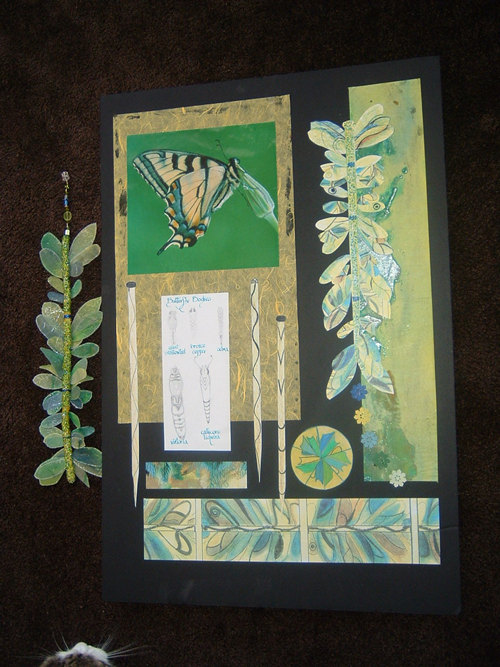
Each assessment piece requires a presentation board showing how you went from the inspiration source to the end result, a book or innovative rendering showcasing the materials, time spent, cost, design ideas, full color mock-up etc., and an appropriate container to house all this. |
|
 Pin, back view |
|
|
These boxes contain the actual materials used and samples done for the project. The open pages of the book at the top are two pages of a large accordion book containing the whole story of creation of the piece. The paper is hand-dyed Arches Text wove. The larger box in the picture is covered with hand decorated paper depicting designs taken from a study of butterfly wings and the two specimen samples and the open book fit into the opening. |
|
 closeup of the butterfly pin |
|
|
||
The byhand Altered Book Project II has begun - look forward to some more great altered pages! |
Stolen Moments |
|
Here are some very helpful tips from the byhandartists Yahoo group. These will help those stolen moments be even better! Thanks to the tippers!We've talked a bit recently about writing with embossing powder.... |
The most important thing (in embossing) is PRISTINE paper..don't
use hand lotion when you are handling your paper, if you are using lose
card stock purchased from a scrapbook store grab from the bottom usually
the top sheets have already been handled far too much. Vickie "mack" |
|
If you still find powder where you don't want it, which happens on dark
linen or other textured card stock, use a dry, fine paint brush to remove
it. |
One thing I do that releases excess powder is turn the piece
upside down and do a little finger tap on the back before I use the heat
gun.. Vickie "Mack" |
|
Rub one of your anti-static sheets from drying clothes over the paper
before stamping it to prevent the powder from adhering where you don't
want it! ...just be sure there are no oils in the dryer sheet....some of them
have scents infused by using a slightly oily base and the powder will
stick to anything it touches. |
I decided a few days ago that there wasn't any reason you
can't put detail EP in a melting pot....and made some great embellishments
if you want to take a look I created a page of them with recipes :) http://www.b-muse.com/UTEE-PolymerClay.HTM Vickie "Mack" |
|
...the adhesive that "glues" the embossing powder to the page is in the
powder...has nothing to do with the ink all it is doing is holding the
powder in place long enough to melt. |
...if you use Bic erasable pens to write, you can emboss it.
Rose in Victoria |
|
... I don't know anything about liquid embossing fluid but I do know
that you can quite easily emboss using gel pens. The "gel" is actually
glycerin and it stays wet enough to allow you to sprinkle embossing powder
on and heat per usual. In fact you can use plain ol' glycerin to write
with and do the same thing. |
When Zoe asked: What do you keep your PVA or its equal in so that the brush stands upright, other than those extraordinarily expensive glue pots. Judi R. replied: Put a clothespeg (strange piece of equipment used before the invention of dryer fluff) facing in both directions on your brush and then it won't sink into the container, you can move the pegs as the glue level goes up and down. I just use the glue bottle and wrap a bit of plastic around it when I leave it, the stuff never seems to actually dry out. I guess that a small yogurt container with a hole cut in the lid the size of the brush would work too. I also use the peg method when I am soaking brushes that perhaps didn't get quite as clean as they could have. On that note, not-so-clean-brushes that is, a friend from tole society told me that Oxy-clean (get it at safeway or anyplace like that, with the laundry detergents) can get almost any brush clean, even those poor soldiers that have been soooo neglected. Even works on oil paint and gives the bristles a wonderful new lease on life. Not that any of US would have brushes like that around. I haven't tried it but she swears by it. |
Lorna's Star BookIn November Lorna came down from Kamloops to have a weekend of bookbinding classes I was teaching at Island Blue Print. Although she didn't complete her book in class, she went home and did a magnificent job. She sent me these photos and complete description, which I really thought I should share! Thanks Lorna! |
|
 First The strips of paper with dark brown were created by sprinkling instant coffee on damp card stock (some plain some with etched pattern -fingernail) and leaving it dry. On left tucked in strip is a Book mark- (inscription "Let each man exercise the art he knows") - made from part of a wood business cards from Lee Valley, clipiola and wooden bead. On right, cut out stamped oak leaf: inserted tag with "When love speaks the heart listens". I used my computer for these (not being a calligrapher .yet) - on onion skin and then glued them to the tags. Worked well. The strip across the bottom has wee wooden beads sewn on. I got these beauties at Wal-Mart. You will see them later too. . |
 Second The background, bear and dragonfly was done on the computer. I was playing with transparency and learning a lot. Printed it on onion skin and glued (glue stick) it on - looks like part of the paper. Quote printed from computer - mulberry paper backing; page trimmed with strips of thin wood. |
 Third Clipiolas fastened on with Crystal Lacquer. Stamped expression rubbed gently after stamping with powdered Gold Leaf and Metallic Powders (Island Blue Print.) I just put a WEE tich on my finger to do this. Loved the results and used it throughout book to mellow tags, and enhance stamping etc. The wire in the cut out is from some Christmas decoration I got several years ago at Art Knapp's. Glued wee gold stars in the back ground (tunnel). I love the quote (from internet) about the stars and think it would make a great stamp. Author unknown Again rubbed with metallic powder. . Background tree stamp done with a sage shadow stamp pad. |
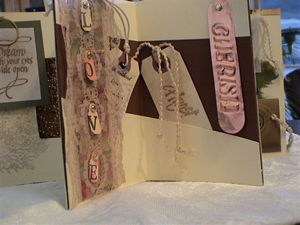 Fourth A left over piece of ribbon with tags attached with bards. Letters stamped then colored with Chartpak pens. Page is made from three pieces of paper which created pockets. (Actually I ran out of the paper for the page and had to manufacture this - it worked) Tag in left says "Life without love is like a tree without blossom and fruit. " - printed on onion skin with same transparent background as behind bear. Copper tag embossed with "Cherish" - printed it from computer backwards, glued (glue stick) it to back of tag and dry embossed it. Tag here has "Hugs" on one side and your wee heart stamp on the back - again treated with metallic powder. |
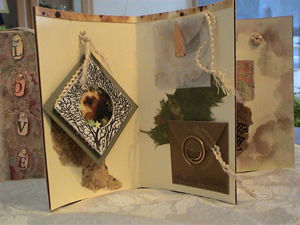 Fifth Wee envelope treated with metallic powder to mellow it Used two sided tap to fasten the copper book dart that holds flap closed. Bottom envelope made from bronze vellum and clipiola used to hold flap. Of course - glued into place with Crystal Lacquer. Stamped round tags in each one. Mulberry paper scrap behind them. On left is the square with circle. Hmmmm It is a shaker style mounting. I used a piece of sheet foam for this. Background is a piece of the "coffee paper" and stars are loose to shake - except for those that decided to stick to the edge. Front is stamped with the tree stamp. A piece of wool tied around edge (nice way to disguise the foam) and then fastened on with a brad. Top of page trimmed with coffee paper. |
|
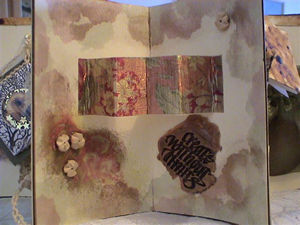 Sixth Stamped around edge with a home made shadow stamp using soft pink and sage green shadow stamp inks and rubbed with metallic powder. (Not sure which color likely the copper?) On left is swirled, heated embossing powder - clear, colored and metallic- melted right on the card stock. Wood beads positioned in hot liquid (but had to be glued later). "Create Without Limits" was stamped with black ink first and then into hot liquid embossing powder (on parchment paper ) When cooled - attached to book page with double sided tape. The pop out is covered with some of the ribbon and the lace, which came off - was mounted in behind. |
 |
 |
|
 |
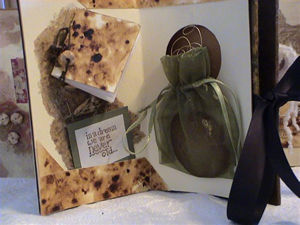
 |
|
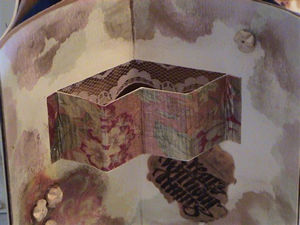
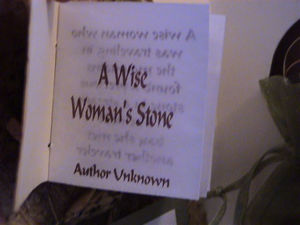
Seventh Coffee paper used for book cover; at the top and pocket at bottom. Clipiola used so book can be taken out to read. Booklet stitched together with embroidery thread and beads tied on. Background piece is wheat that was lacquered onto mulberry paper. (It use to be on the front of a note book -I save a LOT of stuff.) On right, twisted wire fills the circle and organza bag fastened on with crystal lacquer. (while setting, use parchment paper inside bag to keep front from sticking) The "stone" inside the bag is Brazilian agate stamped with the wee heart and embossed with copper. I printed the wee book on my computer after figuring out the layout so I could fold and cut it. It is in sepia color on onion skin. The story, found on the Internet, http://inspirationpeak.com/kindness.html goes like this. A
Wise Woman's Stone I used copper book darts on ribbon ends held in place with wee drop of crystal lacquer. I guess that is about it. I am considering doing a melted powder with "Create Without Limits" for the front cover. Will see how it goes. It certainly was a creative experience. |
|
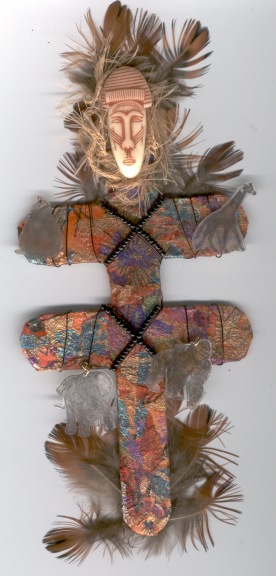
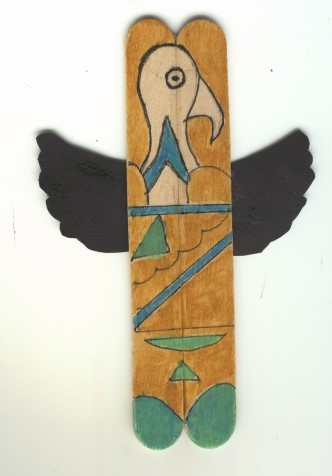
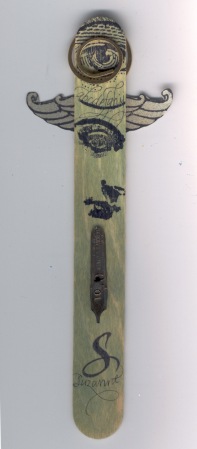
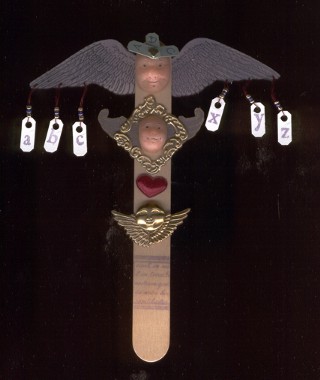
Totem Pole ChallengeThis idea started with the Altered Islanders, and Susan
Horton's Westcoast themed altered book.(You may see these in the March
2003 byhand) Each person in the round robin was requested to create an
altered totem pole from a tongue depressor! I thought this was a good
challenge and suggested it to the byhandartists group. Let's have a round
of applause for the creative bodies that rose to the challenge!
Ellen Harper
Veronica Goff
Anne Atkinson
Suzanne Cannon |
 |
|
If there is any information you would like to see in this newsletter,
let me know. Each month I will email you to let you know the new issue
is published. If you know someone who would like to receive notice of
byhand, just have them email me and I
will put them on the list. Bye for now and thanks for visiting! suzanne@quietfiredesign.com |
|
|
The original title lettering of byhand was done with a Mitchell's Roundhand Nib, size 0, and Higgins Eternal Ink. Quietfire Design Rubber stamps were used to create the other designs. |
| byhand Newsletter | Quietfire Design home page |
| Calligraphic Art | Handbound Books | Rubber Stamps | Ordering Information |
| Publications | Exhibitions | Calendar of Events | Classes | About Us |